

Odometry in robotics is a general term which refers to estimating not only the distance traveled but the entire trajectory of a moving robot. So, for every instance of time, there is a vector which describes the complete pose of the robot at that instance. There are numerous ways to determine the trajectory of a moving robot. One those is visual odometry. In this approach, the images from a camera (or an array of cameras) rigidly attached to a moving object (such as a car or a robot) are used to construct a 6-DOF trajectory. When using just one camera, it is called monocular visual odometry. This idea of using just the camera to figure out the trajectory of a robot is not only applicable to robotics but also for augmented and virtual reality applications where a trajectory of the user must be generated.
Based on the concepts of visual odometry, I, along with a final year student Vikram, decided to come up with an android app which can be used recreate the trajectory of the user based on the input video feed and allow the user take panoramas at any desired location in real-time. With the hence given motion between the captured images, this will enable the virtual walkthrough mechanism. Such type of navigation would also be useful in unknown environments for mobile robots with cameras mounted on them and hence would also have applications at the Autonomous Ground Vehicle research group we are both a part of.
I created a very basic UI for the android app (being a novice in this aspect) and used the java code mostly for acquiring the data from the camera and storing the images in the memory of the android device. The real action was achieved by the C++ code in which the actual algorithm for visual odometry was coded in and the communication between these parts of the project was achieved by creating a java wrapper for the C++ code using JNI and the android NDK. The algorithm used can be briefly described as follows:
- Acquire input images from the android camera and transfer them to the native C++ code through JNI. At this stage, a very important fact that I noticed after debugging a segmentation fault in code for about two hours was that while OpenCV and indeed most other image processing libraries assume the images to be in RGB format by default, the android camera communicates RGB-alpha four channel images. These needed to be converted to RGB.
- Apply image correction by lens distortion removal and noise removal.
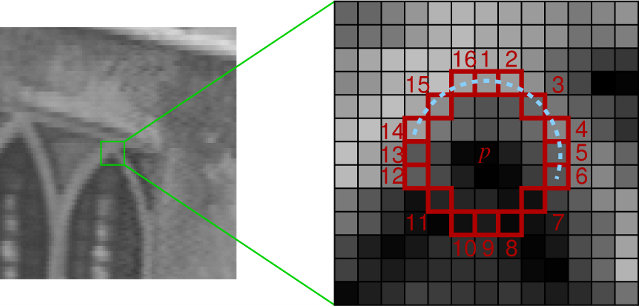
- Feature detection: We used corners in the image for this purpose and the detector of choice was FAST (Features from Accelerated Segment Test), mainly due to its speed (as the name suggests). At each step 2000 corner points were tracked in the images for better accuracy.
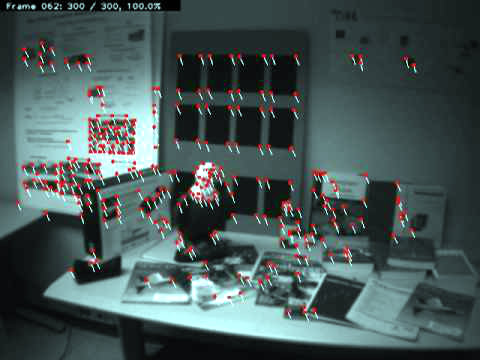
- Feature tracking: We tracked the corners detected by the above method to the next frame using the Kanade–Lucas–Tomasi (KLT) feature tracker and the optical flow field was thus detected.
- Check flow field vectors for potential tracking errors and remove outliers using RANSAC (RANdom SAmple Consensus).
- Estimate the essential matrix between the image pair and recover the rotation and translation matrices using Nister’s 5-point algoritm. Note that this process yields at most 4 solutions of rotation and translation. The solution which is in front of the focal plane is selected using the cheirality check.
- Publish the estimated translation and rotation back to the android code using JNI to be displayed to the user.
The app we created is demonstrated in this video take at IIT Kharagpur’s Central Library on my Moto E 2nd Generation (hence, the slow processing) running Android 5.1 (I apologize for poor quality of the video):
The implementation of panorama creation used standard stitching techiniques built into OpenCV.

I think the admin of this web site is genuinely working hard in favor of his website, for the reason that here
every stuff is quality based material.
Great and an informative content!
obviously like your web site however you need to test the spelling on several of your
posts. A number of them are rife with spelling problems and I find
it very troublesome to inform the truth on the other hand I will definitely come again again.
Yes! Finally someone writes about printer.
I was curious if you ever thought of changing the structure
of your site? Its very well written; I love what youve got to say.
But maybe you could a little more in the way of content so people could
connect with it better. Youve got an awful lot of text for
only having 1 or 2 pictures. Maybe you could space it out better?